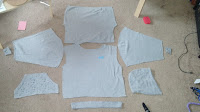
Take one sweatshirt (men's medium, in this case), and disassemble it:
My thought was that if the body panels are tapered and the sleeves turned upside down, they'd make a flared skirt, with the original waistband cut down and re-used:
 |
| The cats are helpful |
For starters, I looked at the sleeves: When folded in half, and then back on itself, you can see that the curve of the cuff was too shallow, and the curve at the shoulder was too deep, so I trimmed both edges to get a nice smooth curve.
 |
| New shape on top, old shape on the bottom |
Once I had the sleeve panels (which are now the side panels of the skirt) trued up, I used them to cut the body pieces into the front and back panels. You'll notice that I have the fold in the side panel parallel to the fold in the body panel, but moved out about an inch so that the corner touches the side edge. I wanted the front and back skirt panels to be wider than the side panels, but I also wanted the angles to be the same.
My sweatshirt had a front pocket, which is awesome. I cut it in half, and set the halves in the front edge of each side panel. The raw cut edge will be caught in the seam, and I topstitched along the original bottom and side stitching lines.
Once the pockets were in place, sew the pieces together and take a look at the ribbing for the waistband.
The ribbing was way bigger than my waist, so I used my handy dress form to figure out about how long a low, relaxed waistband should be.
Stitch where the pin is, and grab the drawstring from the hood. I should have stitched buttonholes or used metal eyelets, but instead I just cut a couple of small slits for the ends to come through.
Pin: center front, center back, sides, and then halfway between each of those, making sure the drawstring is safely tucked inside the folded waistband.
And stitch. You can see how the waistband is a little shorter than the skirt panel below it. So give it a little stretch, just enough for both sides to lie smoothly together.
When it's done, it's kind of wobbly, and this shows on the outside, too.
And smooths everything out nicely on the outside.
And done! Okay, so I could hem the bottom, but the raw cut edge fits the aesthetic of a chopped up sweatshirt skirt. I could also press it before photographing it for posterity, but meh. This was all just a proof of concept.


No comments:
Post a Comment