Saturday, June 6, 2020

Oh, that's better

This is my third completed tesseract.  The second wasn't particularly successful, and not really worth talking about right now.


There are several changes from the previous one:
It's larger, to take the bulk of a rechargeable battery.
It's rechargeable.
I used a clear filament, so the whole thing glows with the LEDs, which is nice.
I added an ATTiny microcontroler to run RGB LEDs through the spectrum.


Man, am I happy with it.

Some process pics:

My first etched PCB!

Yes, it's small. Savvy observers will note that there are only three resistors for all eight LEDs; one each for red, green, and blue.  This isn't ideal, and the next will have each LED with its own resistor.


RGB LEDs wired in


The wires run up the spokes to the charging port and switch. They're fine enough that they more or less disappear inside the box.


I was constantly testing the LEDs to make sure wires hadn't wiggled themselves loose.


Thursday, April 16, 2020

Mass(k) production

I'm part of  a team organized by my employer to make a *lot* of masks for donation to area hospitals.  We're working in batches of 50.  I've streamlined the process with mass production in mind, and I'm documenting my shortcuts here.  Things to keep in mind about mass production: Tool changes are expensive, they cost time.  Figuring out what the next step is counts as a tool change.  Try to break your process down into the smallest possible steps, and do them for your whole batch before moving on to the next step.

With that in mind,

Step 1: cutting and material prep:

Wash and dry your fabrics on the hottest setting possible.  We want them as clean as possible, and to shrink as much as they're going to.  Iron all fabric before cutting.

You need:
 
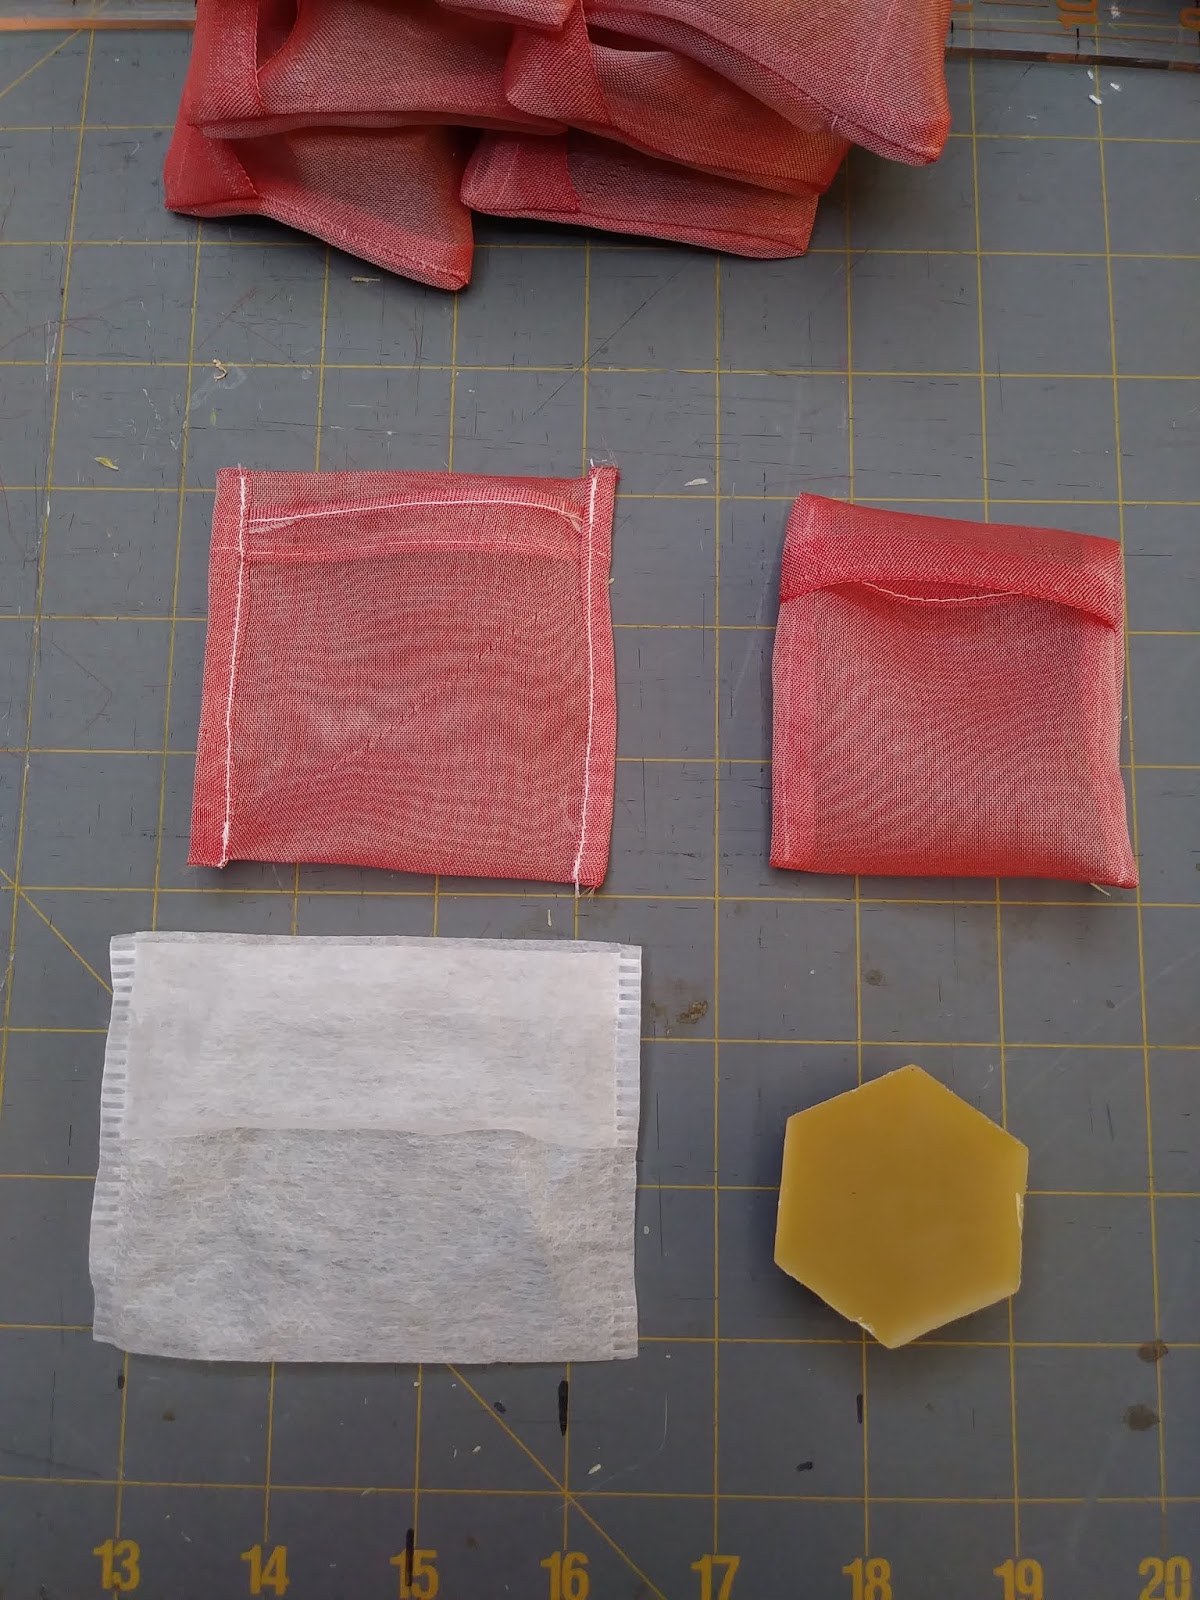
  • 8" x 8" squares of your outer fabric, lining, and whatever inner fabric/filter/interfacing you're using. I'm using cotton quilting fabric, unbleached muslin, and Pellon non-woven sew-in interfacing.
    •  Tip: If you stack your fabrics before you cut, you'll spend less time adjusting and arranging things later.  Remember to put the face of the outer fabric against your lining, not the interlining.
  • Two 1 1/2" x 36" fabric strips, cut on grain. I'm using muslin here, too.
  • One nose stiffener, 4" finished, after the ends have been bent back.  I'm using a piece of 16(?) gauge aluminum wire I had lying around.

With your fabrics stacked, sew across the top with a 3/4" seam allowance, and then the bottom with 1/4".  (if mass-producing, do all of the tops, and then all of the bottoms.


Turn and press.  You'll get a neater edge if you press your seam allowances open first, and then turn them and press again. I'm not sure it's worth the extra time, for a little extra accuracy, though.
using a dowel, because I don't have a sleeve board


Next we're going to sew the channel for the stiffener.  I've given myself some guidelines on the bed of my sewing machine using blue washi tape.  They are 1 5/8" in front of the needle, 1 5/8 " to the left of the needle, and 1/2" behind the needle.

Make sure you have the side of the mask with the 3/4" seam allowance.


Match the left side of the mask to the left guideline, and stitch down until the top of the mask reaches the back guideline.
 
 With the needle down, lift the presser foot, and pivot.  Continue sewing a half inch from the edge, until the right edge passes the front guideline, and stop.  If you're only sewing one mask, you can put the nose wire in immediately, but for mass production purposes, I'd do this for all of the masks, then put all the wires in, then finish them all.

Insert the wire, making sure you're between the interfacing and its own seam allowance.  I found these long-nosed pliers handy.


Finish by sewing from the top edge down to where you stopped before, pivot, and stitch over the last few stitches to secure the seam.


Not quite clear?  Here's a video.

Next, we sew the pleats, and for that we're looking at the second set of guidelines: the pink tape 1" in front of the needle, and 1 1/4" behind.


Start sewing from the bottom edge of the mask and when that edge hits the guideline behind the needle, stop with the needle down.  Use a tool (I used a seam ripper, pretty much anything skinny will do) to lift the mask at the front guideline,

pinch it into a pleat,

and bring that fold under the presser foot and up against the needle.


Stitch 1/2 inch, and stop with the needle down.  For my machine, with its current settings, that's five stitches exactly.

 Lift the next pleat, pinch, position it under the presser foot and against the needle, stitch another half inch.  Repeat for the third pleat, and stitch to the end.


Once again, you deserve a video:


I've found it easier to move to the ironing board at this point rather than try to reproduce the pleats on the other side.  This takes some finesse, and improves with practice, but it's worth it.  I've found it easiest to take it as a gradual process.  First, make sure the three pleats form three waves on the other end, not just two. 


Pull the top and bottom edges so they're more or less parallel, and ease the pleats into position.


  Once you've got them more or less parallel, press,


and then stitch to secure them.

And again, especially because this is something my hands know more about than my brain does, video:


The ties are cut on the straight grain (not the bias!) because you don't need the stretch when binding straight edges, and you don't *want* the stretch for ties.

Make a little clip 2" on either side of the center of the tie. I did this folded, and in a large stack.


Actually sewing the ties is a bit too fiddly for me to take my own photos as I go, so I'm going to rely on the video, plus written instructions:


Take the end of the strip, fold down 1/4", and then fold the long edges to the center, and fold the whole thing in half.  Sew back and forth across the end a few times with the open side facing you, and the tie to the right of the needle. End with the needle down at the front corner, and pivot the tie to sew down the length.  Fold the edges in as you go, running a finger down the opening to encourage everything to stay straight and tucked and even.

When you get to the first notch, fold past it, but keep your finger on (or near) it, stopping sewing when you're just in front of the presser foot.

Fold in the edges for the next length of tie, and tuck the mask in between the layers.  Sew across the mask, and then continue down the second half, remembering to turn the last edge in.  Sew across the end, several times.

Repeat for the other side.

Trim all threads.


50 masks, approximately 16 hours, total

Thursday, March 26, 2020

Tesseract 1

To say that I was inspired  by Sean Hodgins' tesseract would be a massive understatement. I've spent the last three-ish weeks working on different ways of making one, for someone without easy access to tritium.

My first go is LEDs, using frosted acrylic rod to conduct the light along the length of the connectors.


One of the sides isn't glued in place, it pops out so I can access the switch on the inside.

Terrible photo! So sorry!

Similarly, one of the sides of the inner cube pops out, so I can replace the battery.  The battery is a 3V coin cell that's smaller than the standard 2032, and I'm not sure what I'm going to replace it with when it dies.  The 2032 won't fit in the box.  

I ran into a few issues.
I couldn't get mirrors as thin as his prints were designed for, and then the guys who cut my mirrors weren't very precise, so my mirrors didn't fit the prints I made from Sean's design.  So I dinked around on TinkerCad until I could make my own cubes.  I didn't plan for a switch on the outside (I didn't want visible wires running out from the center, but I think I know how to at least make it look intentional).  The acrylic rods didn't transmit light as well as I hoped.  Next time, I'll put something reflective on the far end, see if that helps.  I didn't really plan for a way to open it.  At the moment, the "door" side is held in place by just  a pressure fit, and is harder to get out than I expected.  Lastly, I was in a hurry to get it done, so I didn't give the super glue  enough time to cure, so the fumes frosted the acrylic slightly.

Overall, not bad for a first run, and I have a list of tweaks to make the next one better.

Friday, March 20, 2020

Electronics?!? What?

So, a few years ago, I spent a few years working part-time as a technician in an electronics shop.  I built cables, inspected circuit boards and replaced bad components, that sort of thing.  I gained a fair amount of technical skill, but while I knew what to do, I had no idea what I was *doing,* and that bothered me.

Years later, I'm finally doing something about it.

I worked through Make: Electronics and the Sparkfun Inventor's Kit (both editions; there was enough of a delay between when I decided to do this, and when I finally did it that the new edition was out, and an upgrade kit was available.  I do recommend the earlier edition of the SIK book if you're into that sort of thing, there are more different kinds of sensors covered.

And then I made some stuff.

I made a binary counter, that could theoretically be worn as a pendant, especially if you found a better means of power management!


I made digital dice!


And of course I did the whole range of usual intro to electronic projects, which weren't worth documenting.  It's fun!  And I have a much better foundation to build on.

What next?  Things get really fun.

Thursday, March 19, 2020

Not dead yet

I'm sure I'm not the only one who will be rebooting neglected blogs, in this time of social distancing.
I have plenty of projects to post updates on, and a massive backlog of photos, but I'm going to indulge my short attention span and focus on my current obsessions.  I am definitely still sewing; textile-related pursuits will not ever stop.  But right now, I'm focusing on electronics.  So this blog is going to be taking a bit of a turn, while I indulge my inner toymaker.


Stay tuned.

Saturday, June 9, 2018

Plausibly Period Sewing Kits

I made a set of plausibly period sewing kits as gifts for a team of stitchers who are working on a project for me, and for them to give another team working on a similar project.  I meant to print up little documentation cards to go in them, but was derailed by a family emergency.  Please forgive the lack of references and citations, I hope to gradually improve this post as time allows. Also, as I was making these for people with a wide variety of places and times of interest, I made no effort to be excruciatingly correct for any one time and place, but rather to find a collection of tools that were at least plausible for a wide range.

The elements of the kits are a combination of made, purchased, and modified.

Small bentwood boxes seem to be common choices for sewing kits, or at least later-period art suggests so.  These little bentwood boxes aren't anything like what would be used in period, relying on very thin plywood bonded to some kind of fabric to be a flexible cover.  I didn't realize there was a synthetic center, so I reinforced the thin wood by gluing down some silk.  I had some plastic washers that did a fabulous job of keeping the knotted elastic from blowing right through the thin wood.  Gluing in the silk was time-consuming, and maybe not necessary. Adding the washers was necessary and easy. (the cord stretches between the two visible holes and hooks over the knob barely visible on the lid)

I've been using one of these for a week, keeping it in my purse and not being particularly careful with it.  It's holding up well so far.

Pins and needles:
 The pins are modern glass-headed pins; I've seen references to glass-headed pins, but didn't take the time to track them down for this project.

Hand-made needles very similar to those held by the Museum of London are available, but prohibitively expensive, and while I looked into making my own, I ran out of time and energy.

Needle case:
Cylindrical wood tubes were used as pin and needle cases on the Mary Rose, though those had stoppers, not caps, and had dividers so they could be used as thread-winders at the same time.
These were a batch of seconds, where the lid didn't fit tightly.  I wrapped them with waxed thread to snug up the fit.


Beeswax and pouch
The wax hexagons are from a friend who keeps bees.  To protect the wax from lint, and to protect the rest of the contents of the kit from wax, I wanted a little pouch to keep it in.  A reusable/disposable tea bag was about the right size, so I copied it (tweaking the dimensions) out of a silk organza. I wanted a thin fabric that wouldn't add a lot of bulk, and I wanted a stiff fabric that wouldn't cling to the wax while inserting and removing it. I happened to have a remnant of rose-colored silk organza with an intact selvedge edge, which cut down on my narrow hems in disobedient fabric.  (Silk organza is kind of a nightmare to work with)

clockwise from top left: inside out bag, right side out bag, wax, original tea bag.

I have no evidence that anything like this thimble would have been used in period, but I know from experience that the secret to using a thimble is having one that fits well, so I wanted something adjustable. Modern adjustable ring thimbles exist, but they all look really cheap.

Caution: when using a leather thimble, the eye end of the needle will eventually inevitably punch through and into your finger.  This will hurt a lot when it happens, because it only happens when you're using a lot of force.

The tails are doubtless too long.  Adjust to fit and trim as desired.


Snips and sheath
This type of springy shear was pretty common throughout period.  I didn't notice until I was almost done inserting them into their sheathes that the "spring" part is actually plastic.

I apologize, but as I was fooled for a long time *with them in my hands,* I think they'll pass.

The leather sheath is just to keep the tips covered, for safety.  The loop is meant for hanging.


Awls and Bodkins
Bone, modern.  The awls are a very common Victorian design (though there's nothing about them that couldn't or necessarily even wouldn't have been done in period)


Thread winders
These are based sort of roughly off of a Viking find, and were a massive exercise (for me) in poor decision making.

Wood is not my medium.  Therefore, I have not earned the right to take short cuts, even though I know there are shortcuts to be had.

They exist.

That's enough.


Other people's research and variations:
A Viking/Saxon Sewing Box
Putting Together A Medieval Sewing Kit

Friday, February 16, 2018

I've been making progress on my epic to-do list.

I've arranged to give some stuff away (hasn't happened yet, I need to pick up mailing supplies):

The Noro Spatwarmers, ends woven in, yarn used calculated so I could update the pattern page, and a new home found.
Silk fabric remnants to be turned into ribbon yarn will go to an art teacher.
Silk/rayon burnout sample and its unattached lining to be a scarf will go to a friend.
microfiber twill skirt needs closure, has a new home.
rust wool open hood, needs liripipe extension has new home.
3 pairs fighter pants are going to the group they were intended for, eight years ago.  (Only two pairs, it turns out)
Assortment of wool hose in various stages of completion will go to someone they will fit.
Silk appliques cut for a project that never happened have a new home.

I've also wrapped up some projects:

Silk shirt has been made into a cushion cover for a friend (It's a little overstuffed.  The pillow form is too large for the maximum square the shirt could take)


t-shirt shrug had a gusset added.  I'm still not tickled by the fit, it's very high across the shoulders, which I did on purpose, but am not sure about the effect.


One coif got strings replaced, another got assembly (but not pressing)


Forehead cloth got linen lining and strings.  Technically, there's a gap in the stitching (where it was turned right-side out) but I completely forgot about it until this moment, and it shouldn't affect the wearing much.


Unfortunately, I also found a few more projects I'd forgotten about:

Another wool hood, this one in need of buttons and some kind of edge finish (I was thinking tablet-woven trim, but now I'm not sure I'm going to be wearing it enough to warrant that much work.  Maybe I should let this one go, too.


Ugh, this burnout velvet dress.  This isn't *nice* burnout velvet, with rayon pile on a silk ground, this is *cheap* burnout velvet, with rayon pile and a nylon ground.  It SHIFTS.  It moves. The burn-out paste was printed off-grain, so I can either cut on grain, or I can match the pattern. I lined it with a silk charmeuse (because it was a good color match, and available) and it's more wiggly than the silk.  Horrible. At any rate, I don't remember what was so wrong with this one that I abandoned it and started over, because I also have a *completed* dress like this.  But something went wrong, very wrong. 


Tweed vest and blazer, times two.
This set looks good on my husband, but his proportions don't allow off-the-rack suits, or at least not the kind of suits you buy off the rack at Target, so I need to alter his to fit.  And then the fabric turned out to be a shockingly good match for a skirt I own, so I got a set for me, too.  I'm pretty much going to have to re-cut mine entirely.  It's okay, though; a friend of mine has started doing Tweed Rides, and they sound like fun, and this is a near-instant outfit I can wear.  ...once I get it altered.


Socks, half-knit, discovered in the back of the car.


Softest white wool, to be a coat.  (I forgot to allow for bulk *under* the coat, so I'm opening up all of the seams to the minimal seam allowance possible, maybe to be reinforced by embroidery over the seams?)  ...do I even want to keep this garment?


So.  Some work done, much left to do. 

Oh, that's better

This is my third completed tesseract.  The second wasn't particularly successful, and not really worth talking about right now. There ar...