Showing posts with label homestuck. Show all posts

Monday, April 24, 2017

Needlekind Specibus: The Pages

I made pages for the Strife Specibus binder, including some good process shots, but I'm kind of done with this project, so you're going to get some pictures without commentary.


I thought I had pictures of the finished interchangeable/circulars page, but apparently not.
Anyway.  Done.

Sunday, April 23, 2017

Cosplay

Silicon Valley Comic Con was this weekend, and I was enlisted to help out with some costumes.

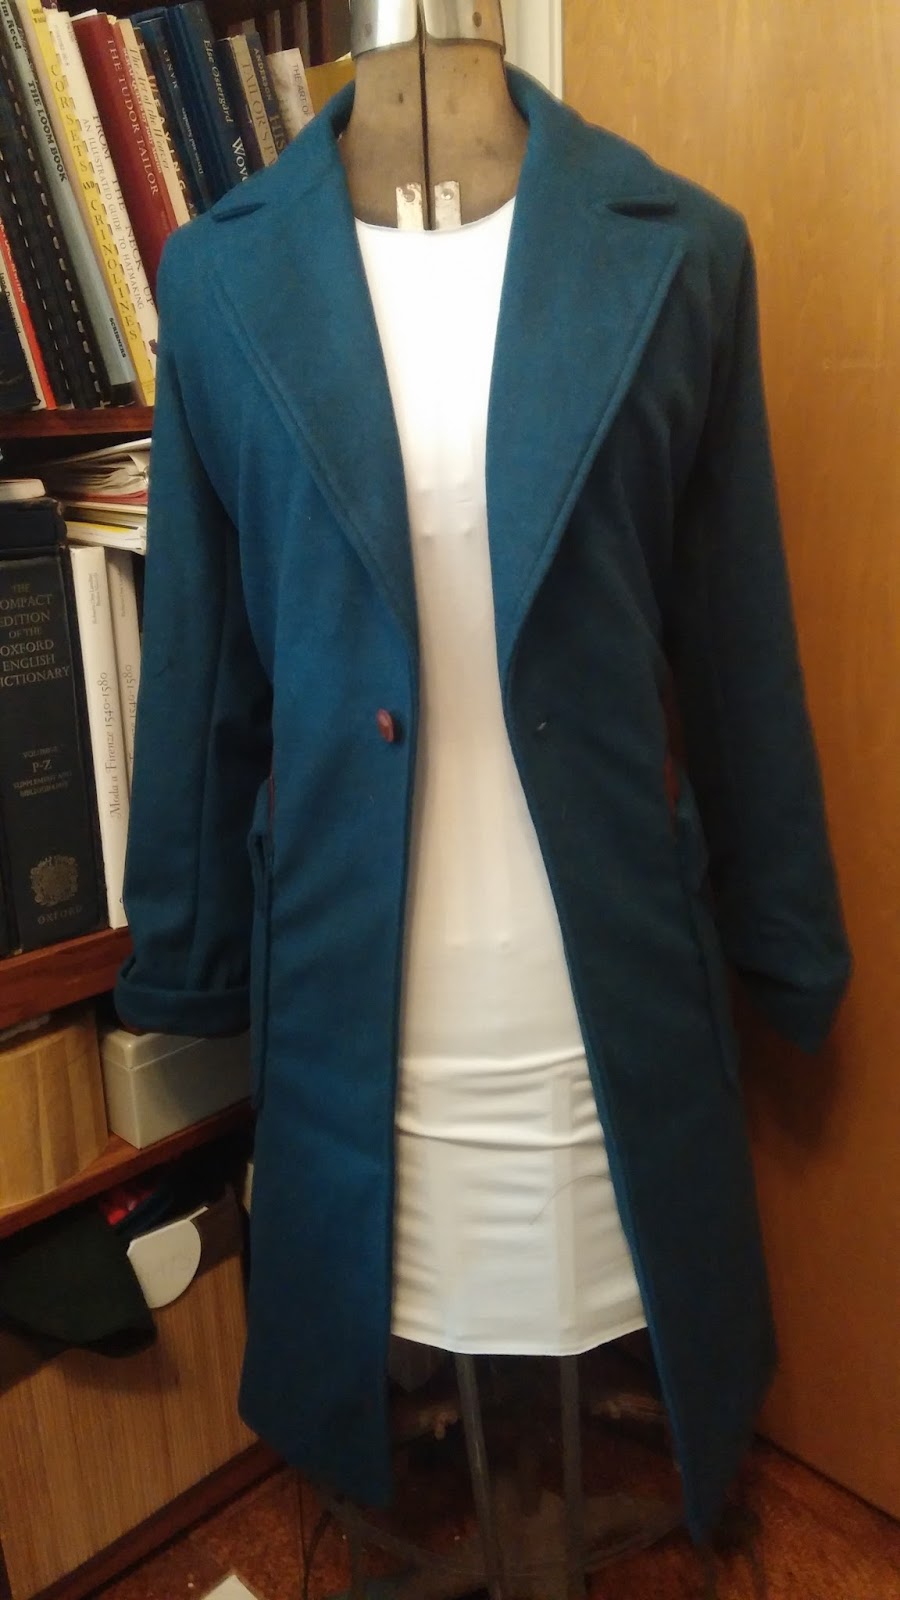
First, I had a friend who ordered a "custom" Newt Scamander overcoat off of Amazon, only to have it arrive large enough for it to close around two people her size.  (This was determined experimentally)

Before
After


(There are Reasons she chose not to have the maker handle the alteration or provide a substitute. I won't go into that here.)

Then, another friend suddenly required a Zapp Brannigan costume, which we worked up in an evening.

And, finally, since I had the strife specibus and all, this happened.


The con was a blast.  Finding other Homestuck kids was awesome. There will be more cosplay in the future.

Thursday, April 6, 2017

Needlekind strife specibus: the cover

I have a new theme.  I think I hate it.  Yup, I hated it. Fixed it.

Homestuck fangirl needlebook continued:

Once I had the inside cover panels done, I needed to actually install them onto the binder.

First, I made little bridges at the top and bottom, connecting the two panels. These will sit above and below the binder hardware, covering that little gap of cardboard, and also the raw edges.


Slip the whole thing over the hardware, tuck the edges under (remember, the hardware is only attached to the cover at the two large rivets. There's tons of room underneath),


Using the seam ripper to slip the excess under the hardware

...and glue down.  I used 3M Super 77, because This to That included it as a suggestion for gluing fabric to paper. ...I sort of regret using it, or at least wish I'd been more careful, because I got some overspray onto the pouch pockets, and now they're sticky.  I'll have to test goo-gone on a scrap to see if I can clean it off without making more of a mess.

At any rate, needing to clean up doesn't stop me from moving on to the next bit: the outer cover.

I finally decided to just have my image printed professionally (yay, drug store instant photo printing!) to sit under a piece of clear vinyl. I've trimmed the photo to size, and cut out a piece of vinyl a little larger than the front cover, and a piece of taffeta significantly larger that the whole cover.

Sew the clear vinyl down along the spine of the binder

outer cover and the binder with the inner cover sticking out

Align everything and hold in place with pins and binder clips (Not shown: it was ugly, and I didn't have enough hands)

Use a zipper foot to stitch through the excess of both layers, right up against the cardboard, allllll the way around.  I'm stitching from the inside, because I want the outside surface to be as flush as possible.  Also, the binder won't lay flat face down, so I really have no choice.


Turn it around, and....


Damn.
DAMN!
The photo slipped.
I should have glued it before stitching.
I should have stitched the image side first, to reduce chance of slipping.
I should have...it doesn't really matter. I didn't.  So now I need to fix it.

I can't just rip out the stitching, re-set the image, and sew again.  Vinyl and photographic paper are both utterly unforgiving when it comes to being sewn.  But, the edge is going to get a layer of bias tape, so extra holes in the vinyl won't show (badly).  It'll be okay, as long as I line things up really well when I re-do it.

The photograph may have to be scrapped, which is a shame.  ...mostly.  I'm not sure it shows in the photo, but the glossy surface of the photo and the clear vinyl aren't playing well together.  They're sticking in some spots and not in others, and it looks dirty.    I think re-printing with a matte finish may solve that.  Also, the contrast between the greens was less than I expected.  I may have to adjust the color levels of my image.

So I need to get the photo out, but I don't want to lose the alignment of the vinyl.  Easy, I'm going to stitch again, just outside of the current stitching line.  That will give a little slack, but not so much that I have to re-set completely.  Pull out the stitches, open one full side, pull out the photo.

You'll notice that I planned on cutting down the jagged bit of the photo as an afterthought, and I didn't think to do anything differently when doing the alignment stitching.  It's okay, the new stitching line worked like perforation and the trapped bit just tore out, no problem, no fuss.

Re-printed the image, on satin paper instead of glossy this time. Cut it to size, insert, re-stitch.  Not bad.  I did wander onto the surface of the image in one spot, but I've decided I don't care.  It's so small, it'll barely show.


Time to install the zipper, which means first preparing the zipper.  The zipper by itself doesn't fill the whole gap around the edge of the binder, so the first thing I'll do is add strips of the taffeta: Two for each half, so all of the seam allowances are sealed between layers.

Splayed out so you can see the layers.  Obviously they were lined up to sew.

 Trim all seam allowances to 1/4", including my new zipper gusset.

I also cut some bias binding at this point because I thought I was going to stitch it all in one go. heh. Nope.
Stitch the zipper all the way around, still using the zipper foot.  The corners were tricky. That's all I'm going to say.

Now to bind it: Stitching down the binding was very much like stitching down the zipper
Stitch it down

Wrap it around
 Realize, belatedly, I should have installed the zipper after stitching down the first layer of binding. Also, something I've been wrestling with the whole time while sewing the cover in place: The hardware of the binder interferes with stitching, I can't get close to the top and bottom of the spine.  Also, with the zipper sewn in the way it is, the binder won't lie open flat anymore (oops), so I had no choice but to sew the binding over the spine by hand.  Which I put off for several weeks because it seemed hard.  When I finally got to it, it wasn't actually that bad.

And the binder's done!
Note the zipper tab to the left. That allows the zipper to open past the spine, which allows the binder to open fully.  Or would, if I hadn't stitched the zipper across the top.


I also realized, a little too late, that I forgot to sew down the elastic for a tape measure.  Either I'll glue down a piece of felt for needles instead, or...use the appalling curved needles that I hate? That's a terrible option.  Ah, well, burn that bridge when I come to it.

Thursday, March 9, 2017

Captchalogue card pouch pocket

I'm making a Homestuck-inspired needle case out of a binder.  The accessory pockets will reference captchalogue cards.

First, cut your pieces.

These are the parts for the three small accessory pockets on the inside cover; the rest of the demonstration will be of the single large pocket on the back cover, because larger is more clear, and I forgot to take photos of the parts for that before I started sewing.
Things to notice: the pink vinyl is cut to its final shape and size. The clear vinyl is cut a little larger, and the white backing material is cut significantly longer (and a little wider). 

The inside of the binder will be covered with a vinyl-backed nylon taffeta, which is nice and smooth, pretty thin while still being sturdy, and I happen to have a lot of scraps of it.  When I did my sample on just the nylon taffeta, the fabric buckled unevenly under the pocket, so I decided I needed to back it with a sturdy interfacing.  Also when I did my sample, I found it very difficult to line up exactly where it needed to go.  To solve both problems, I traced the outline of the pocket on the interfacing (upside down), and used that as a stitching guide to sew the two pieces together.  Now I can easily see on the front where the pocket needs to be placed, and the two pieces are securely bound together.
black on black on black.  Hard to photograph. Sorry.

 Next, I stitched the pink and clear vinyl pieces (pink on the outside) to the zipper.  They're lined up on the top and right-hand sides in this photo, the clear vinyl is larger and sticks out on the left and bottom.

Then, using my stitched line from the first step, I sew the zipper to the taffeta, only exactly as long as the pink vinyl panel.
I changed to white thread, so you can't see the stitching.
 Then I tucked the backing fabric under the zipper, and stitched it down along the zipper's edge.  important to note: I lined up the white fabric even with the right side of the pink vinyl, with the excess sticking out to the left, which is where the top of the zipper is.  This side of the pocket will have a gusset for easy access.  (Less important with this big pocket, but sort of critical for the tiny ones.)  Once I'd stitched along the top, I marked where the edge of the pocket would be, and stitched the backing down to the vinyl well inside of that line.  (I actually did this from the back where it was easiest to see the pocket boundaries.


I cut off (and fray-checked!) the ends of the zipper, and move  the zipper pull toward the center, so I could sew the left-hand edges of the three layers together: pink, clear and white.  If you do this, don't forget to secure the cut-off ends of your zippers by sewing over them several times to create thread stops.  Otherwise you'll zip your zipper pull right off the end, and there will be tears.

This process took both hands, so I only have a photo of the finished result.  You can see how the excess white fabric makes a nice pleat under the left-hand edge of the vinyl.


Using binder clips to keep everything under control, I lined up the pink vinyl with the stitched boundaries on the black taffeta.

...And stitched down the two free sides.


Last step was to take my sharpest, slimmest scissors and cut off the excess clear and white layers, following the pink edges. And that's how I made a zippered captchalogue card pouch, to be set into a binder.


Now to do it three more times, and smaller!

Wednesday, March 8, 2017

Needlekind Strife Specibus needle case, part 2

A little over a year ago, I outlined my plans for a knitting needle case.

When I sat down and tried to design it, though, I hit a major case of decision paralysis.  How big, exactly, should it be? How big, exactly, should the pockets be? None of it mattered in the grand scheme of things, but I actually had to pick *something,* repeatedly.  Every pocket needed dimensions. Every needle slot, the placement of each elastic, everything had to go somewhere, and because none of it mattered, none of it went anywhere.  I was stuck.

A few weeks ago, I found a small-scale 3-ring binder, and decided to build my needle case around it.  Suddenly, I had a constraint, and suddenly everything else was easy. Well, the first few steps are, anyway.  The big thing is that by using a binder with rings, if my inner pages don't work out, it'll be simple to improve them and swap them out.  No longer bound by the need for everything to be perfect and perfectly planned, I was able to start.


Now, the tricky bit was always going to be the accessory pockets, designed to look like a captcha card.  In the world of Homestuck, a character's possessions are stored on Captchalogue cards.

 How great would it be to have little pouches with clear vinyl windows and white backgrounds, so that the item inside the pouch showed up?

pretty damn great

 There's a zipper along the left, a gusset on the bottom, and all layers are stitched down on the top and right-hand sides.

Step-by-step tutorial to follow.

Oh, and incidentally, the pink vinyl I had on hand happens to be hilariously reflective.


Oh, that's better

This is my third completed tesseract.  The second wasn't particularly successful, and not really worth talking about right now. There ar...