Thursday, March 9, 2017

Sweatshirt to skirt adaptation

I have an oversized sweatshirt with a graphic print that I very much like, but the shirt itself is poorly made and waaaaay too big.  Like, the sleeves are made so large they won't stay up when I push them up.  I've been playing with ideas of how to make it more awesome, and turning it into a skirt is one idea I had.  I really like the graphic, though, and I can't get another if I screw it up, so I'm testing my idea on another shirt first.

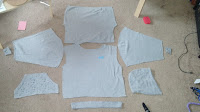
Take one sweatshirt (men's medium, in this case), and disassemble it:


My thought was that if the body panels are tapered and the sleeves turned upside down, they'd make a flared skirt, with the original waistband cut down and re-used:
The cats are helpful
The first step is truing up the panels.

For starters, I looked at the sleeves: When folded in half, and then back on itself, you can see that the curve of the cuff was too shallow, and the curve at the shoulder was too deep, so I trimmed both edges to get a nice smooth curve.


New shape on top, old shape on the bottom
 
Once I had the sleeve panels (which are now the side panels of the skirt) trued up, I used them to cut the body pieces into the front and back panels.  You'll notice that I have the fold in the side panel parallel to the fold in the body panel, but moved out about an inch so that the corner touches the side edge.  I wanted the front and back skirt panels to be wider than the side panels, but I also wanted the angles to be the same.

My sweatshirt had a front pocket, which is awesome.  I cut it in half, and set the halves in the front edge of each side panel.  The raw cut edge will be caught in the seam, and I topstitched along the original bottom and side stitching lines.


Once the pockets were in place, sew the pieces together and take a look at the ribbing for the waistband.


The ribbing was way bigger than my waist, so I used my handy dress form to figure out about how long a low, relaxed waistband should be.

Stitch where the pin is, and grab the drawstring from the hood.  I should have stitched buttonholes or used metal eyelets, but instead I just cut a couple of small slits for the ends to come through.


Pin: center front, center back, sides, and then halfway between each of those, making sure the drawstring is safely tucked inside the folded waistband.


And stitch. You can see how the waistband is a little shorter than the skirt panel below it. So give it a little stretch, just enough for both sides to lie smoothly together.

 
When it's done, it's kind of wobbly, and this shows on the outside, too.


So from the right side, I'm topstitching the seam allowance down, which gives a nice finished edge on the inside,


And smooths everything out nicely on the outside.

And done!  Okay, so I could hem the bottom, but the raw cut edge fits the aesthetic of a chopped up sweatshirt skirt.  I could also press it before photographing it for posterity, but meh.  This was all just a proof of concept.


Captchalogue card pouch pocket

I'm making a Homestuck-inspired needle case out of a binder.  The accessory pockets will reference captchalogue cards.

First, cut your pieces.

These are the parts for the three small accessory pockets on the inside cover; the rest of the demonstration will be of the single large pocket on the back cover, because larger is more clear, and I forgot to take photos of the parts for that before I started sewing.
Things to notice: the pink vinyl is cut to its final shape and size. The clear vinyl is cut a little larger, and the white backing material is cut significantly longer (and a little wider). 

The inside of the binder will be covered with a vinyl-backed nylon taffeta, which is nice and smooth, pretty thin while still being sturdy, and I happen to have a lot of scraps of it.  When I did my sample on just the nylon taffeta, the fabric buckled unevenly under the pocket, so I decided I needed to back it with a sturdy interfacing.  Also when I did my sample, I found it very difficult to line up exactly where it needed to go.  To solve both problems, I traced the outline of the pocket on the interfacing (upside down), and used that as a stitching guide to sew the two pieces together.  Now I can easily see on the front where the pocket needs to be placed, and the two pieces are securely bound together.
black on black on black.  Hard to photograph. Sorry.

 Next, I stitched the pink and clear vinyl pieces (pink on the outside) to the zipper.  They're lined up on the top and right-hand sides in this photo, the clear vinyl is larger and sticks out on the left and bottom.

Then, using my stitched line from the first step, I sew the zipper to the taffeta, only exactly as long as the pink vinyl panel.
I changed to white thread, so you can't see the stitching.
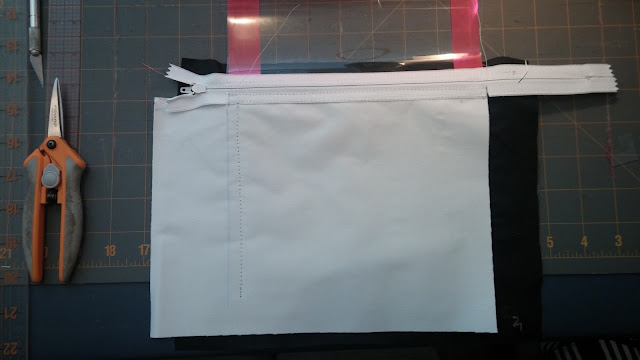
 Then I tucked the backing fabric under the zipper, and stitched it down along the zipper's edge.  important to note: I lined up the white fabric even with the right side of the pink vinyl, with the excess sticking out to the left, which is where the top of the zipper is.  This side of the pocket will have a gusset for easy access.  (Less important with this big pocket, but sort of critical for the tiny ones.)  Once I'd stitched along the top, I marked where the edge of the pocket would be, and stitched the backing down to the vinyl well inside of that line.  (I actually did this from the back where it was easiest to see the pocket boundaries.


I cut off (and fray-checked!) the ends of the zipper, and move  the zipper pull toward the center, so I could sew the left-hand edges of the three layers together: pink, clear and white.  If you do this, don't forget to secure the cut-off ends of your zippers by sewing over them several times to create thread stops.  Otherwise you'll zip your zipper pull right off the end, and there will be tears.

This process took both hands, so I only have a photo of the finished result.  You can see how the excess white fabric makes a nice pleat under the left-hand edge of the vinyl.


Using binder clips to keep everything under control, I lined up the pink vinyl with the stitched boundaries on the black taffeta.

...And stitched down the two free sides.


Last step was to take my sharpest, slimmest scissors and cut off the excess clear and white layers, following the pink edges. And that's how I made a zippered captchalogue card pouch, to be set into a binder.


Now to do it three more times, and smaller!

Wednesday, March 8, 2017

Needlekind Strife Specibus needle case, part 2

A little over a year ago, I outlined my plans for a knitting needle case.

When I sat down and tried to design it, though, I hit a major case of decision paralysis.  How big, exactly, should it be? How big, exactly, should the pockets be? None of it mattered in the grand scheme of things, but I actually had to pick *something,* repeatedly.  Every pocket needed dimensions. Every needle slot, the placement of each elastic, everything had to go somewhere, and because none of it mattered, none of it went anywhere.  I was stuck.

A few weeks ago, I found a small-scale 3-ring binder, and decided to build my needle case around it.  Suddenly, I had a constraint, and suddenly everything else was easy. Well, the first few steps are, anyway.  The big thing is that by using a binder with rings, if my inner pages don't work out, it'll be simple to improve them and swap them out.  No longer bound by the need for everything to be perfect and perfectly planned, I was able to start.


Now, the tricky bit was always going to be the accessory pockets, designed to look like a captcha card.  In the world of Homestuck, a character's possessions are stored on Captchalogue cards.

 How great would it be to have little pouches with clear vinyl windows and white backgrounds, so that the item inside the pouch showed up?

pretty damn great

 There's a zipper along the left, a gusset on the bottom, and all layers are stitched down on the top and right-hand sides.

Step-by-step tutorial to follow.

Oh, and incidentally, the pink vinyl I had on hand happens to be hilariously reflective.


Oh, that's better

This is my third completed tesseract.  The second wasn't particularly successful, and not really worth talking about right now. There ar...