Wednesday, March 23, 2016

Well, that got out of hand

Continuing my theme of "let's make late-period garb that doesn't suck to wear in hot weather, outdoors!" (what, you didn't know that was a theme?), I've been working on a new gown from this lovely, light, airy, summer-weight wool, in a pale smokey purple.


But it's kind of a problematic color: too pale to be interesting to a renaissance eye, so it needs *something* to add interest.  Some contrasting-but-coordinating bands on the skirt perhaps.


Okay, nice, but a little matchy-matchy interior decoratorish.  Well, it's a place to start, why don't I go to the fabric store and see what I can find in terms of accessories.

A hat! Of course I'll make a hat, and I'll need feathers to trim it.


Yes, lovely.  Not something they would have done (bleach a perfectly good peacock feather? Never!) but very pretty and matches the color well.


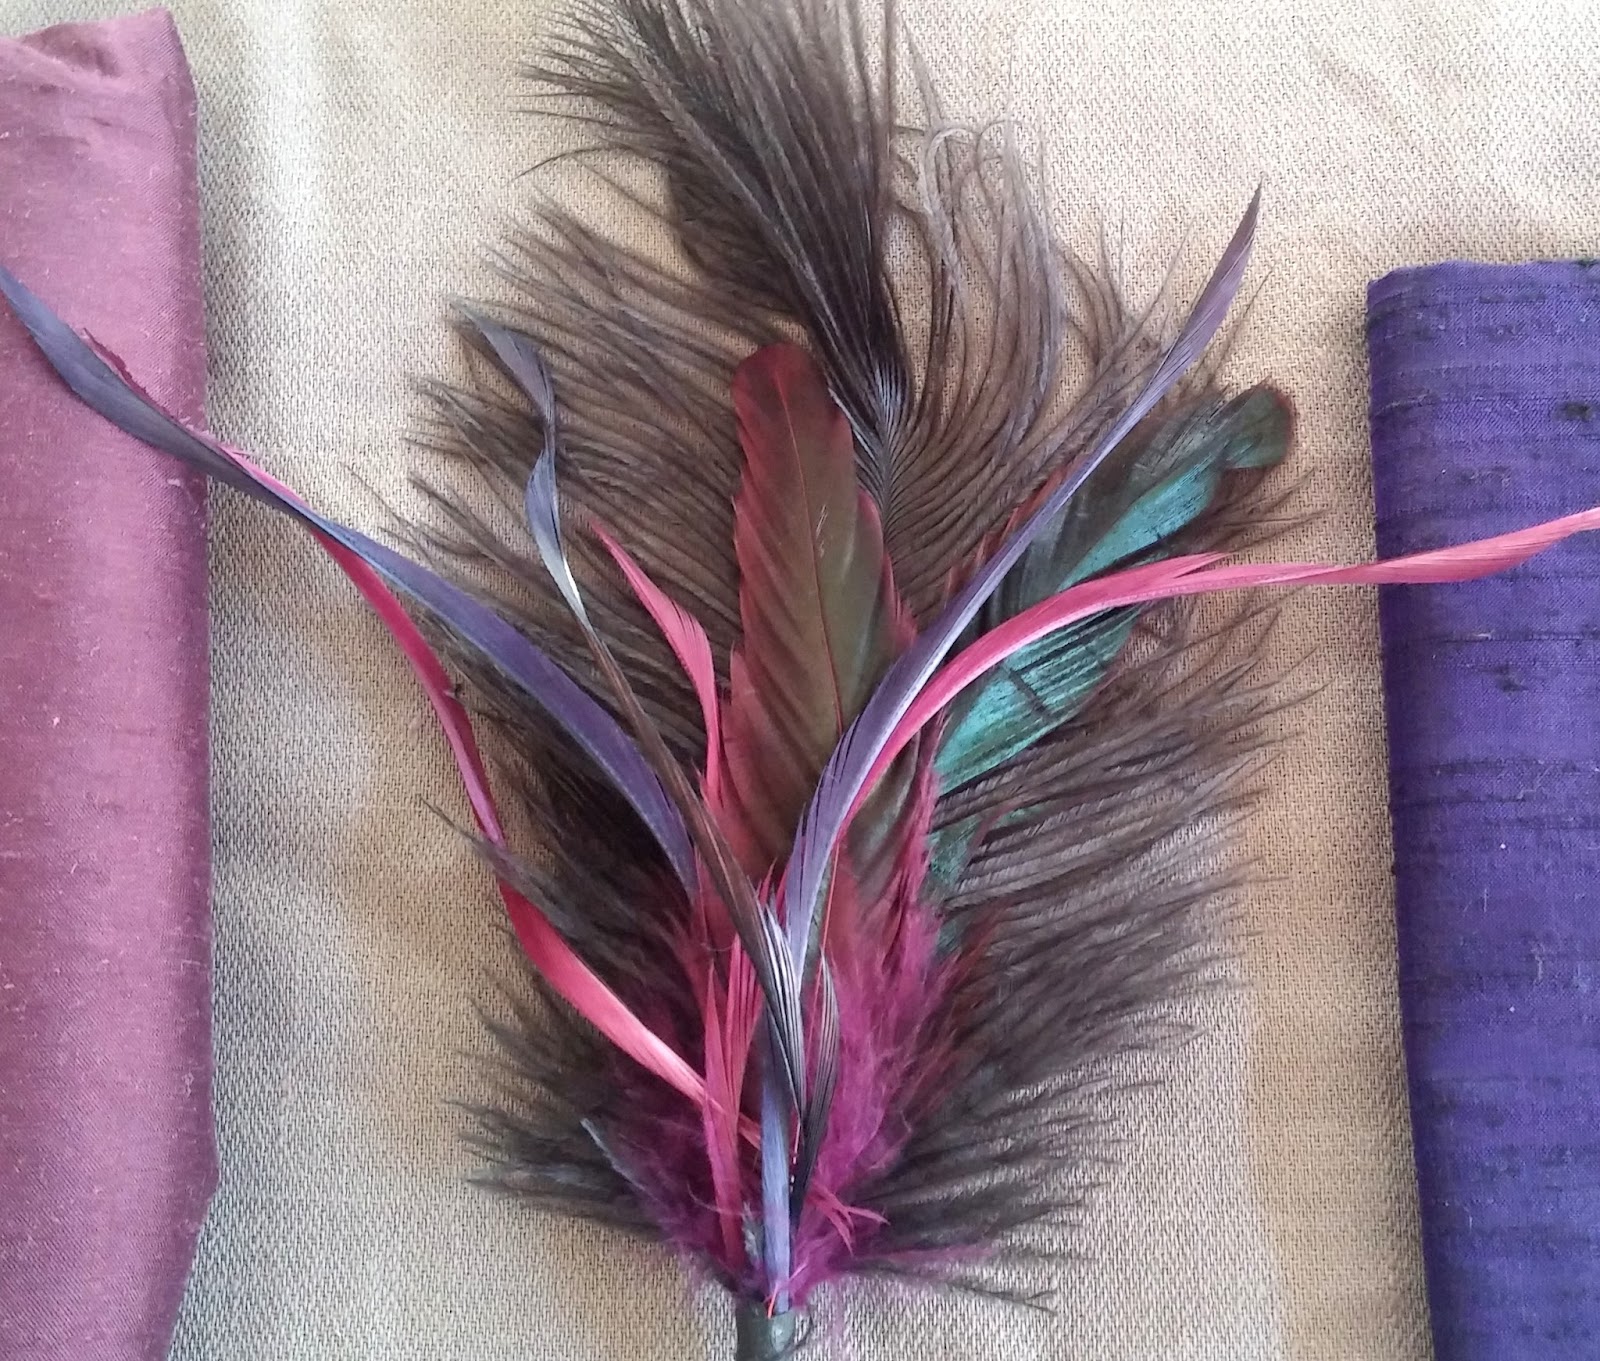
Ooh, even better!  Yes, this is good.  And I have fabrics to match!


But do you see that shot of green?  WAIT.  I HAVE JUST THE THING!

YES!  THE EMERALD/FUCHSIA IRIDESCENT SILK IS AWESOME...for my simple, washed-out gown.


Charcoal.  Charcoal guards on a palest purple gown will be just fine.

I do think I'm on to something, with the plumage and the silks.  Just not for *this* project.

Monday, March 14, 2016

Corset Variations part 2


Right, so I had these place mats, see...


I traced my pattern onto them (I'm not going to go into how I drafted my pattern. It's enough to say that it's more or less a mashup of the Effigy corset and my own usual pattern.)

Because I was afraid the material would fall apart when cut, I sewed down the bias binding before cutting it out.

Turns out, I was right to worry.  

I added a fabric panel for the front, where the boning angle changes in the effigy corset, partly so I would have two fewer seams to bind, and partly so I'd have something to insert eyelets into.  I wasn't sure how the place mat/eyelet thing was going to work, otherwise.


The pieces, all bound save the top edges.  Notice that the center back panel is longer than the sides it's going to match up with.  I changed my mind about the width of the back panel at the last minute, so where it was going to slope down to meet the fronts, it didn't any longer.  The height of the front panels was limited by the width of the mat.  I had already shortened the front point by a few inches, there wasn't anything I could do but trim the back panel after the fact. 


I cut a triangle of the mat (after stitching around the edges, of course) to slip into the fabric front pieces.   I'd thought about sewing boning channels as usual, but that seemed like too much work.  I did insert straws into the center front binding to give the front edge some structure. (not shown in this photo)

Top stitching to keep things from shifting.

The front and back panels were butted together and stitched flat with what I think of as a baseball stitch.  

I added the back extension and straps and finished binding the edges.
Because there wasn't much holding this thing together *but* the binding, I made it a little wider than I normally would.  This was probably a mistake, I always forget how much easier narrow binding is, especially around curves.  I also used the binding doubled, to protect myself from the ends of the straws, but that resulted in a bulkier binding than I maybe would have preferred.

It fits okay.  It actually seems a little roomy, I think I'd be better off overlapping the bound edges instead of butting them together.  Not a big deal, I can change that.


Thoughts:
First things first:  This is *NOT* a period method of corset construction.  There is no evidence (that I'm aware of) that this was ever done. Please don't even say this is something they "could" have done. I mostly did this because it amused me.  It *might* have been quicker than making stays properly, but I'm not sure about that.  With all of the adjustments required by the width of the place mats, and the awkwardness of binding edges that were actively falling apart on me, I'm not sure this actually saved time.  This *might* be a cooler corset for hot events, but I suspect any advantage will be counteracted by the layers over it, unless I'm very careful.  And it might not even be a successful corset: I'm still not sure it won't just fall apart on me after a day of wear.

The straws at the waist are already starting to crease, after being worn for just long enough to take some photos, and not being particularly tight.  This does not bode well.

But ultimately, I am amused.

Saturday, March 5, 2016

Variations on corset boning

There aren't many extant corsets from the 16th Century, but one of the surviving fragments uses very fine reeds, like broom straw, as boning.  Consequently, many reenactors have made corsets using broom straw, usually to good effect.

But I've got this idea.

See, I picked up this set of place mats to use for felt-making; they were at the thrift store and cheaper and larger than sushi mats.  Upon closer examination, they seem to be woven with a cotton warp and a broom straw weft.  Now, when I make a renaissance corset, I usually angle the boning channels to follow the contours of the corset, which usually results in a roughly fan-shaped arrangement, from the bottom edge to the top.  But if you look at the effigy corset, the boning channels are parallel within their panels.

So.  I'm going to take my place mats, cut them in the shapes of my corset panels, bind the edges, and have....an extremely breathable, summer-weight, boning-only corset? 

Seems worth a shot.

And now that I've said it, I'll actually do it.

Right?

Wednesday, February 10, 2016

Strife Specibus: Needlekind

Here's where I make an embarrassing confession.

I'm a Homestuck fan.

If you're not familiar, the only real way to understand is to follow that link up there and wade in, but be warned: it's really long, really confusing, and you may or may not enjoy it at all.  In brief, it's a webcomic about some kids who play a game.

One element of the game is that each player has a weapon type (the Strife Specibus) which is contained on a deck of cards.  One of the specibi mentioned in the comic is needlekind: knitting needles, generally (but not always) used in pairs, generally (but not always) used to perform magic.

After seeing a file folder on Pinterest that someone had transformed into a Paperkind specibus, I was consumed with the idea of making a case for all of my sock-related knitting needles.

This is a problem in two parts: The inside, and the outside.
 The outside is tricky, because if it doesn't look right, it won't *be* right, and while I'm not likely to run into anybody who'd know, I'd know.  If my strife specibus were an image in a webcomic or video game, it would look something like this:

I need to tweak the assorted needle images to make them all equally pixelated.
I'm still working on how, exactly, this is going to work.  A friend has a kickass embroidery machine, so once I work it into the correct file format, a combination of machine embroidery and piecing or applique is likely.  I considered one of those opaque iron-on transfers, but they tend not to be quite as crisp as I require, and also not as durable as I'd like.  Anyway, still thinking.

The inside is a little easier, since there are countless knitting needle case tutorials all over the internet, and while none of them are exactly what I want, several of them are close enough that it doesn't matter.  I'll mostly be following this one, though of course giving it the jagged corner.

I know I'll need lots and lots of slots for small double-pointed needles.  My shortest ones are 4 inches, and the longest ones I'd want in this set are 7 inches.  They vary in size from 0000 (1.25mm?) to 4 (3.5mm), with most of them being in the 2-2.5mm range. I have as many as 6 of some sets and as few as 3 in others.  I have some very wide elastic, and I'm thinking of using it to make the slots: it'll be forgiving of variations in quantity and diameter, and hold the needles firmly.  For width of the slots, I have the very first roll-up case I ever made, where I agonized over slot size and more or less like how it came out.  I know I will want some way of marking needle size permanently, but haven't figured out exactly how that's going to work.  At least one page of my "book" will be these.

I know I'll need some pouches for circular needles.  I currently have circulars in three sizes, but might want to have room for a fourth?  One page, front and back, should be sufficient.

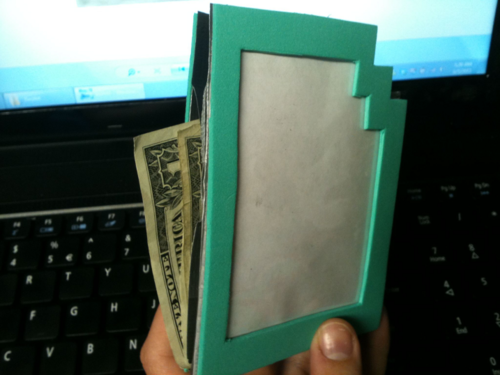
The insides of the covers of the book should be pouches for notions, maybe including a piece of felt to receive sewing needles (which are occasionally also needed in knitting).  If I am terribly clever, these will echo the shape of chaptchalog cards, not unlike this captchalog wallet:

and now that I've thought of it, I'm going to have to do it, aren't I?
 I'll want to have: stitch markers, a tape measure, scissors, maybe a large pattern pocket?  All with white backing and clear vinyl so the items in question are clearly visible. (Slightly refined plan: zipper down the long side, shorter short side and shorter long side stitched down, gusset in longer short side for access)


Anyway.  I still have some things to refine: Size and placements of pockets and pouches. Colors, where colors matter.  Materials throughout.  But overall, I have a pretty good idea of how this thing is going to take shape.

now to just DO it.


Sunday, January 24, 2016

New projects for the New Year

I know, it's almost the end of January already, and the year has some of its shiny rubbed off, but it's been a busy few weeks for me, work-wise, so I'm only just starting to think about "New Year" things now.

I have two fairly major, fairly long-term projects that I'm thinking about right now. 

The first is a wardrobe upgrade.  Over the past few years, I've let my work (mostly manufacturing or other dirty or messy jobs) determine my clothing, and while there's nothing wrong with what I'm wearing now, it isn't anything I'm particularly excited about, or feel expresses who I am very well.  So I've been looking at a lot of pictures on Pinterest, and have been coming up with some ideas about texture, structure, drape and function that I'm looking forward to playing with.  I'll be buying some pieces, adapting others, and making some from scratch.  More on that later.

The second is a continuation and offshoot of an idea I heard about on Ravelry. There's this thing called a sock club, where indie dyers team up with pattern designers and send out sock kits on a monthly or bimonthly basis to members of their clubs.  But knitters are like any crafter: when good materials present themselves, you snap them up, whether you have a project in mind for them or not.  In this way, knitters tend to accumulate certain types of yarns, sometimes well beyond what they can reasonably expect to use.  The fairly fine, frequently brightly-colored yarns intended for socks are often problematic for some knitters in this way.  So somebody suggested creating your own sock club: take the yarns already in your stash, match them up with patterns they'll work well with, put them all in anonymous bags, and whenever you finish a project and need something new to work on, you draw a bag.

I did this last year, and it worked really well for me. One of the biggest hurdles for me in terms of being productive is simple decision paralysis.  This removes the decision-making.  So I'll be bagging up yarns and patterns, but I'll also be bagging up other smallish non-knitting projects that have been languishing. 

So, big(-ish) things coming, in the form of a lot of small things.

Friday, October 23, 2015

Starry Night part 2


It's been months since I wrote the last post (even though it was just published today) and while my plans seemed to be going pretty well, disaster struck.

Well, to be clear, disaster had already struck.  I thought the yarn I'd used on the previous project was larger than it actually was, so this lovely blue and silver stuff turned out to be *smaller,* not larger. Which means the 36 epi I'd been planning on using was going to result in much too loose a fabric.  So I re-threaded a smaller reed, winding up with 45 epi, losing several inches in width in the process.  Oh, well.

Also, I made some mistakes in threading the reed, so there were two areas where there were twice as many threads as there should have been, resulting in visible ridges in the fabric. 
Oh, well.

BUT THEN, I moved to a new apartment, and while this loom nominally folds up with the warp on it for storage and travel, being folded resulted in a large group of threads either getting cut or breaking along an edge, leaving me with dozens of threads to repair.  I'd held back some of the original warp yarn for repairs, but not *this* much.  So I'm having to fill in with a different thread, a little darker.  It'll do, I have no choice.

That wasn't the only moving-related problem, though.  Turns out, when there's no tension on the warp, there isn't much to keep the ratchets in play, so the entire warp unwound itself. when I re-wound it, the tension was really uneven along the width.  (I'd done a better job of winding than I did the first time: still learning!)

So.  I cut off all that I'd woven so far.  I took advantage of this chance to fix the reed-threading errors, and re-tied the warp to the cloth beam, and started over.

It's okay.  It was frustrating and annoying, but the resulting fabric is beautiful.  Or it will be, anyway.


Starry Night part 1

While buying replacement wool for my abortive handwoven medieval gown project, I also picked up two cones of this, in Starry Night (a deep blue) and a light variegated grey.

Each cone holds about 3800 yards.
The last thing I wove at 40 ends per inch came out nicely; this yarn is slightly thicker, and if I use my 12 dent reed and thread three ends per dent, I should end up with a nice fabric with 36 ends per inch.

I think I'd have more useful fabric if I weave at 22 or 24 inches wide, SO:

22 inches times 36 ends per inch = 792 ends.
3800 yards divided by 792 = 4.79 yards, maximum warp length, of which about 4 yards will be usable fabric.

So I will wind a 4 yard, 28 inch warp, about 800 ends.  (I think I'm going to do a color-and-weave pattern, so I can't just wind one cone until it runs out, I do actually have to count and keep track.)

I was originally thinking of a pinwheel pattern, because I like them, and because it would fit with the "starry night" theme I think I've got going on.  But I've done it before, and where's the fun in that?

An undulating twill would work well in silver and blue:


This pattern looks fun:


Ah, got it:


It's a regularized, eight-shaft version of a 16th century structure.  

And it is a solid-colored warp, so I can just wind (at slightly under 5 yards long) until I run out of thread.  Yay!


Tuesday, May 12, 2015

Hood part 3, additional patterning

Now that I have a pattern that works pretty well, I need to do a mockup in a fabric that will behave more like my handwoven fabric will: a light, airy wool crepe, rather than a heavy fulled coating wool.

Also, since I'm using handwoven fabric, I want to be a little more grounded in the research, to make a more historically accurate piece.

Looking through the images linked to here, I noticed a few trends: red was the most common color, but other colors were present (black, brown, blue and yellow).  More stylish hoods had very short skirting, generally not meeting the neckline of the gown.  Many hoods were shown with a white lining, many were shown with no color distinction between the inside and the outside (which may mean it was unlined, and may be the work of a lazy artist).  One in particular seemed to be a pale patterned fabric, lined in green.


My conclusion was that it's just as well my fabric is reddish, and as it's so light that lining seems to be a good idea, it might as well be lined in white. (but if I really wanted to, a silk lining in another color might be acceptable.)

To adjust the pattern for a more accurate cut, I traced my previous pattern onto my fabric, looked at the diagrams of the extant hoods in Textiles and Clothing, and adjusted.  This was the result:
(Sorry, I thought I'd taken an in-process drafting photo, but clearly not.)

When lined, this is the result:


I feel like the turnback is too long, and the back of the neck is kind of baggy.
Taking an inch off the top with a pin makes both issues better.


Only...does anyone else think it suddenly resembles a Cap of Maintenance, being all red with a white lining?  Any pelicans want an open hood?  The liripipe will be extended, you do your own buttons/holes.

Hood part 2: patterning


I have one hood, which was made in a bit of a hurry, and was a re-working of another hood that was just wasn't working, which is why the construction is a little weird:

I mean, really, that gusset at the back of the neck!


 It fits okay open:

 the turn-back is about chin length, which is right, but there isn't really room for my hair in a bun, which pushes the whole hood back a bit (not necessarily a bad thing) and the skirting is too long.  Most of the illustrated examples, the skirting doesn't always reach the neckline of the dress, and this one is wider than my shoulders.

If I were to try to wear it closed, however (assuming I get around to adding buttons and holes), the opening would be too tight.


I thought I'd try the pattern drafted by the lovely Katafalk, as my own hood pattern was questionable.

The first draft turned out rather large.


  I compared it with the other hood, and more or less averaged the two:

 Better, but still not quite right.


 Mostly, there's a TON of room at the back of my head, which I pinned in a bit.


Re-draw the back seamline again:


I tried it on inside out, so that the excess on the inside of that curve didn't screw with the drape too much, just to make sure I hadn't taken out too much. It fit, so I trimmed the seam allowance down to an even 1/2" and turned it right-side out again.


The skirting is still longer than it should be; with this particular mockup, I'm going to leave it that way,  because I'm not fond of that chilly gap between hood and gown, and as this fabric is a nice cashmere/wool blend, this hood will be for warmth.  Also, the transition from hood to liripipe is too gradual, the extant examples (from Textiles and Clothing, and other sources) show a much more abrupt, panhandle shape, more like the gold hood.  I'm leaving the gradual transition, though, too; it fits my hair when it's in a bun on the back of my head, and the purpose of this garment (now that pattern tweaking is done) is to keep me warm in a plausibly medieval way, not strict adherence to authenticity.


Very helpful webpages:
http://larsdatter.com/hoods.htm
http://www.personal.utulsa.edu/~marc-carlson/cloth/hoods.html


Saturday, May 9, 2015

Hood part 1: HANDWOVEN FABRIC!

I HAVE A LOOM!!!

CAPSLOCK IS HOW I FEEL INSIDE!!!

Let's back up a little.
Years and years ago, I fell in love with weaving. I owned a loom. At a yard sale, I found a 10-yard warp another weaver had wound and then abandoned from some superfine wool. It was super cheap. It was 800 ends.

I bought the warp, and slayed my reed, intending to weave some garment-quality fabric for reenactment purposes. But that didn’t happen, years pass, I sold my looms but kept the threaded reed with the expectation that I would one day have another loom and weave my epic fabric.


Now I have that loom. I threaded the heddles, all 800 of them, but I really struggled winding the warp onto the beam. It was a disaster. Threads broke. Threads tangled at the heddles. Threads tangled at the reed.


I realized I was frustrated and struggling, and it was time to cut my losses, and the warp.
I still desperately wanted to weave fabric to sew with, and I’ve been planning this fabric from this warp FOREVER but that doesn’t mean it’s worth continuing if it doesn’t bring me joy.
 
So I cut off the tangled mess, and ordered new thread so I can start fresh. But I’d already wound a couple yards on, so I finished tying it on to the cloth beam, so I’d get at least something from this warp I’ve been carrying around for a decade.


 I am *so glad* I did this.  Cutting off the tangled warp kept me from hating the project before it was begun.  Tying on as much warp as I *had* wound on got me the near-instant gratification I was craving.

And the fabric is LOVELY.


And the cat approves.

Once off the loom, I had to weave in the ends of all of the broken and repaired warp threads:

A repaired warp thread: the ends of the old and new strands

Follow the weave with a needle, to create an inch or so of overlap between the two broken ends
Cut the ends off long enough to allow for shrinkage during wet finishing but short enough not to tangle.
The repair, after being washed in warm water, dried, pressed, and ends trimmed.


A little under a yard and a half of fabric, a little over 18" wide.  Not the medieval gown I was hoping to get from that warp, but enough for a hood, which is good enough.


Oh, that's better

This is my third completed tesseract.  The second wasn't particularly successful, and not really worth talking about right now. There ar...